You can claim money back directly in the Mi Sanitas app — the Reimbursements section lives under More → Administrative procedures, and a pharmacy claim can be made start to finish on your phone.
This guide shows where it is, walks through a pharmacy claim step by step, and covers the documents you need and how you get paid.
Where to find it
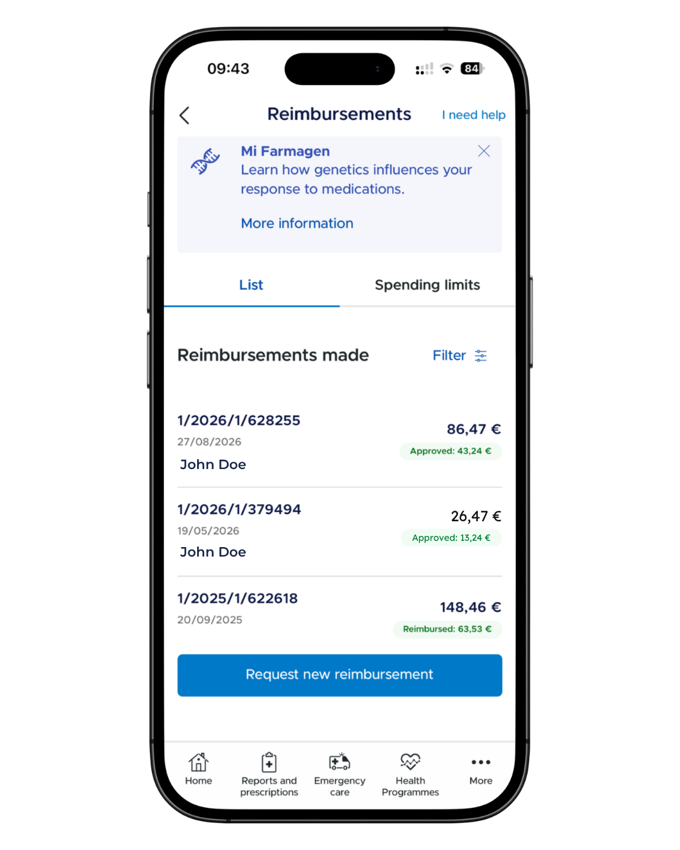
Open More, then Administrative procedures, then Reimbursements. The screen has two tabs: List — every reimbursement you’ve made, each with its reference number, date, amount and status — and Spending limits. There’s also an I need help link at the top, and the Request new reimbursement button starts a claim.
The Reimbursements screen — List and Spending limits tabs, claim statuses, and the Request new reimbursement button. Screenshot from the Mi Sanitas app — details shown are example data.
What you can claim
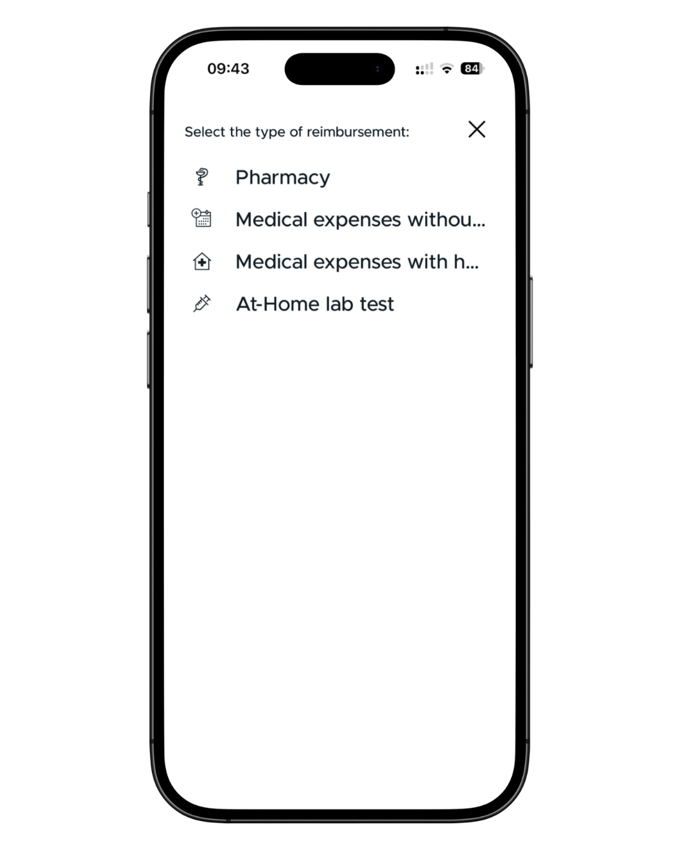
Tap Request new reimbursement and the app asks you to select the type: Pharmacy, Medical expenses without hospitalisation, Medical expenses with hospitalisation, or At-Home lab test.
The walkthrough below follows the pharmacy claim — the other types start the same way, and whichever you choose, have your documents ready before you begin.
Selecting the type of reimbursement. Screenshot from the Mi Sanitas app — details shown are example data.
A pharmacy claim, step by step
Choose Pharmacy. If your cover includes a pharmacy allowance, the app shows how much of it you’ve used.
Select the pharmacy from the list — or use Add new pharmacy — and pick the purchase date.
Add the medication. Choose the type (common medication, personalised vaccine or magistral formula), then find the medicine by its national drug code or name, and enter the amount and total paid.
Check the summary. You can add another medication to the same claim, or save a draft.
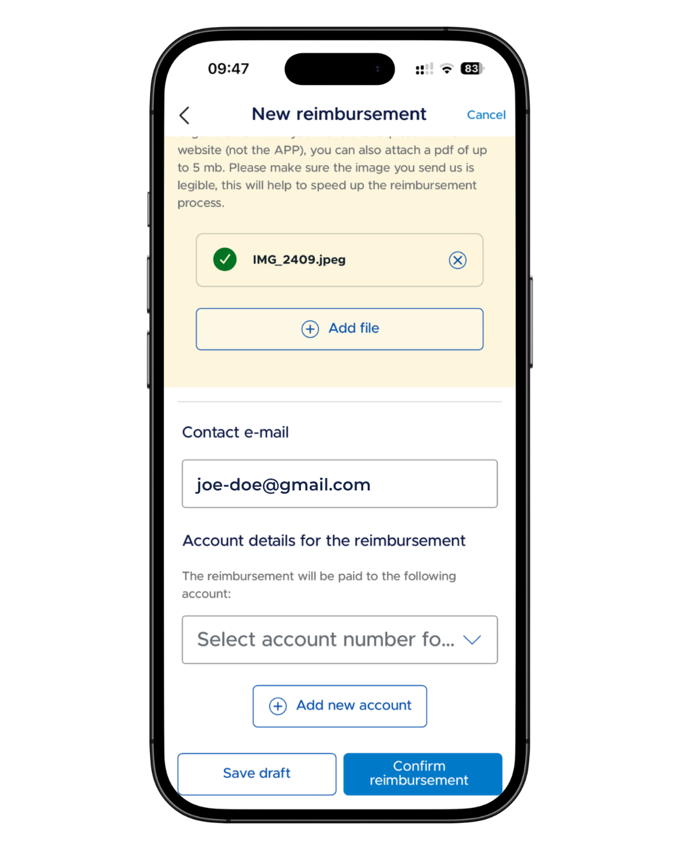
Attach your documents — the invoice or receipt, and the prescription or medical report. Photos (jpg/png) up to 5MB each; the app asks for legible images, and notes that PDFs can be attached on the website instead.
Confirm. Enter a contact email, select or add the bank account the reimbursement will be paid to, and press Confirm reimbursement.
The final step — documents attached, contact email, and the account the reimbursement is paid to. Screenshot from the Mi Sanitas app — details shown are example data.
Tracking your claim
Back in the List tab, each claim shows its reference and amounts as it progresses — you’ll see figures marked Approved and, once paid, Reimbursed. The app doesn’t display a fixed processing time, so we don’t promise one — if a claim seems stuck, use the app’s I need help link or the Sanitas contact routes below.
Getting help
A claim won’t submit, an upload fails, or the app misbehaves? Only Sanitas can help with issues inside the app. Use the Contact section at the bottom of the app’s More menu — telephone numbers, a contact form and offices — or Sanitas Customer service: 91 752 28 52 · 93 362 34 49 · 900 906 210.
Not sure whether an expense is reimbursable under your cover? You can reach us through our contact page.
Frequently asked questions
Open More, then Administrative procedures, then Reimbursements. You’ll see two tabs — List, showing the reimbursements you’ve made with their status, and Spending limits — plus a Request new reimbursement button.
The app offers four claim types: Pharmacy, Medical expenses without hospitalisation, Medical expenses with hospitalisation, and At-Home lab test. This guide walks through the pharmacy claim; the other types start from the same Request new reimbursement button.
Two things: the invoice or receipt, and the prescription or medical report behind it. In the app you attach them as photos — jpg or png up to 5MB each — and the app asks you to make sure the image is legible, which it says helps speed up the reimbursement process.
Not in the app — the app takes photos. The app’s own note says that on the website (not the app) you can also attach a PDF of up to 5MB, so use the Mi Sanitas website if your document is a PDF.
At the final step the app asks for a contact email and the account details for the reimbursement — you select an account number or add a new one, and the reimbursement is paid to that account after you press Confirm reimbursement.
The app doesn’t display a fixed processing time, so we don’t promise one either. Track progress in the List tab — each claim shows its reference, date and amount, with status amounts such as Approved and Reimbursed as it moves along.
Yes — the final screen has a Save draft button next to Confirm reimbursement, so you can come back with a missing document later.
Where a benefit has an annual allowance, the app shows how much of it you’ve used — for example, when you start a pharmacy claim, the app displays your total consumed against the allowance.